Where to Find Breyer This Holiday Season
A guide to nearly 100 physical retailers across 39 states!

Painting a 3D model horse for the first time can be intimidating, especially when you are trying for a realistic horse color. What seems like simple patterns in the real world can seem difficult when it’s time to put paint down on your model. Here, I’ll give you some tips on how to create a chestnut horse with a Stablemates Paint and Play set!
Along with items in the set, you’ll want some paper towels (to try your brush off with between colors and layers,) water in a small cup, a styrofoam plate or something else non-absorbent to use to mix paints (I’m using a scrap piece of palette paper) and a toothpick to help with eye detail. You can also use a hair dryer with a low or cool setting in between layers if you’d like to speed up the drying process.
First, a few other tips that will be helpful for any color you choose to paint:
There are two different ways I would approach a pinto pattern, depending on how much white there will be on your horse. For a horse that has more dark color than its white pattern, I would start with painting your dark color, or “base.”
Here I’ve chosen to create a bay pinto horse, but you can paint them any other color you’d like (black, chestnut, palomino, etc.) For extensive tips on how to paint your base color, take a look at our other tutorials for how to paint a bay, or a chestnut!
Being careful around the edges of your white markings, the key, as always, is to use thin layers of paint that are allowed to dry all the way. The white paint actually covers better than you may expect it to, but also will dry a bit more transparent than it looks when it is wet. Don’t be discouraged!
Remember, legs with white markings have shell, or tan colored hooves, rather than grey hooves. If you hadn’t already painted your hooves like I had this horse (because he was once meant to be solid bay,) you’ll have white feet that you can now paint with a mix of white and brown.
Here I went ahead and just painted over his grey hooves. If your pinto marking allows for solid colored legs, then you’ll also have those hooves grey - just a mix of your white and black paint.
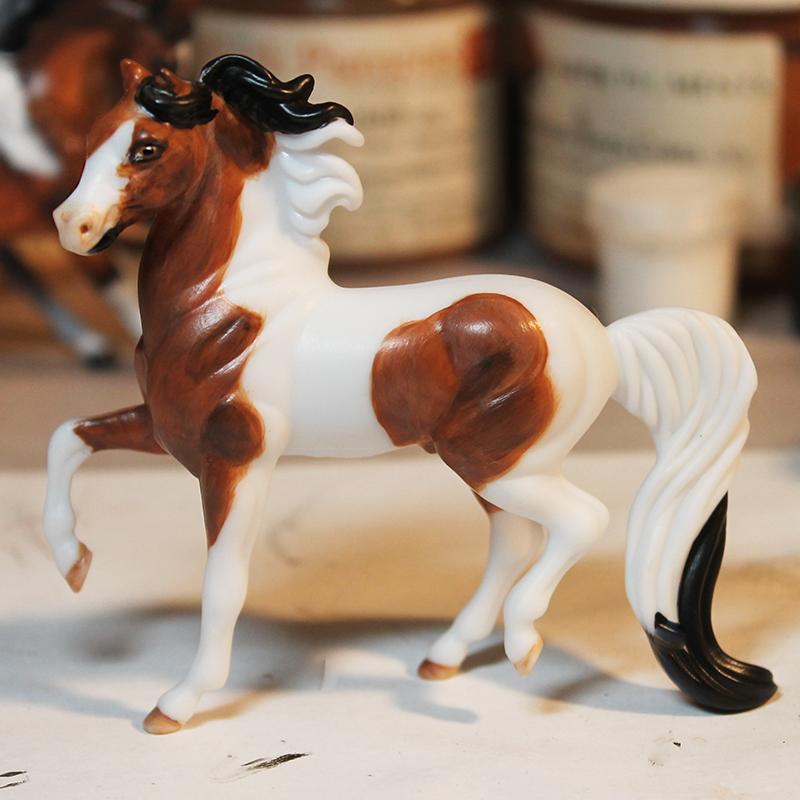
However, what if your pinto has much more white on it than dark color? I’ve found for these paint and play sets, it’s much easier to use the bare white plastic as your white pinto markings, like some of Breyer's own models!
Here I have started with a blank Stablemates model. I’m going to paint him bay as well, and again, lots of tips can be found in the bay and chestnut tutorials if you want to learn how to dramatically shade your horse's coat. This horse is going to be a bright, red bay.
It’s key to know exactly what your markings are going to be before you start, so you can be really neat around your edges and keep them nice and crisp. I’m going to use my brown paint and really fill in the dark areas with a solid color, in many layers.
This is after about 5 layers of brown. I’ve also started to pay attention to where I will need some black paint. Pinto horses have white manes where their coat pattern is white up on the edge of the mane, and dark manes (or whatever color their base coat mane would be) where there isn’t a pinto pattern.
Since this is a bay, that means the colored portion of the mane will be black. To make the tail more interesting, I’ve also added a black tail tip, which a lot of pintos with these types of markings tend to have.
This is my pinto after about 7 layers of brown, which is nice and solid. I can now start to shade the model's coat a bit and work on my details.
To finish up my pinto, I take a mix of brown and a little dab of black to create a darker brown, and used it in the creases of the neck, hip, and low parts of the face to shade. I have also taken a toothpick to work on my eyes - add a dab of white on the corner of the eye, brown for the iris, and black for the pupil. His hooves are shell colored because of his white legs (white and tan mixed.)
With this horse, it’s a good idea so shade his nose as well. When white markings overlap with a horse's nose, the thinner hairs allow the horse's skin color to show through slightly.
You can use the thinness of these paints to your advantage here, by making some pink with your white and brown paint, and washing it over the nose in thin layers. You don’t need to create a solid color, letting the white plastic show through the muzzle will make it nice and soft looking.

A guide to nearly 100 physical retailers across 39 states!

A collection of exclusive models is now arriving at Tractor Supply stores just in time for the holiday season!

We're making room for exciting new 2026 additions!
